| Warning | ||
|---|---|---|
| ||
The contents of this page have not been updated to properly describe the developer interface in version 1.0 of the pico engine. |
How to specify tests in the Testing tab
The tests in the Testing tab are generated from information that you, the developer of a ruleset, define by the compiler, based on the code in your ruleset. The information must be is bound to the name __testing and that name must be is always shared by a pragma in the meta block of your ruleset. That It is , the meta block must specify that the ruleset shares __testingthen used by the developer UI in the Testing tab.
For example, consider this annotated screenshot of a Testing tab. The pico has three rulesets installed. Only the ruleset whose RID is timing_tracker has its checkbox checked, so only its tests are showing. We just clicked on the link "__testing" so the Results area is showing the __testing map itself.
...
By following the green arrows you can see which part of the __testing map specified each test.

The timing_tracker ruleset meta and global blocks are shown here:
| Code Block |
|---|
ruleset timing_tracker {
  meta {
    shares entries, __testing
  }
  global {
    entries = function() {
      ent:timings.defaultsTo({}).values()
    }
    __testing = { "queries": [ { "name": "__testing" },
                               { "name": "entries" } ],
                  "events": [ { "domain": "timing", "type": "started",
                                "attrs": [ "number", "name" ] },
                              { "domain": "timing", "type": "finished",
                                "attrs": [ "number" ] }] }
} |
The name __testing is bound 
The name __testing is bound by the compiler to a map with two keys, "queries" and "events", each of which is an array of maps.
...
An event map has keys "domain" and "type" for the domain and type of the event, and if needed, a key "attrs" whose value is an array of attribute names.
Normally, you won't see a query for __testing, but it will be there if you explicitly share it.
Using the Testing tab to experiment with KRL
...
To begin, we write a test ruleset (named test), as follows (notice that in this ruleset, we replace completely the __testing map created by the compiler):
| Code Block | ||
|---|---|---|
| ||
ruleset test {
  meta {
    shares __testing, entry
  }
  global {
    __testing = { "queries":
      [ { "name": "__testing" }
      , { "name": "entry", "args": [ "key" ] }
      , { "name": "entry" }
      ] , "events":
      [ //{ "domain": "d1", "type": "t1" }
      //, { "domain": "d2", "type": "t2", "attrs": [ "a1", "a2" ] }
      ]
    }
    truthy = "truthy"
    falsy = "falsy"
    entry = function(key){
      {
        "key": key,
        "key.isnull()": key.isnull(),
        "key => truthy | falsy": key => truthy | falsy
      }
    }
  }
} |
...
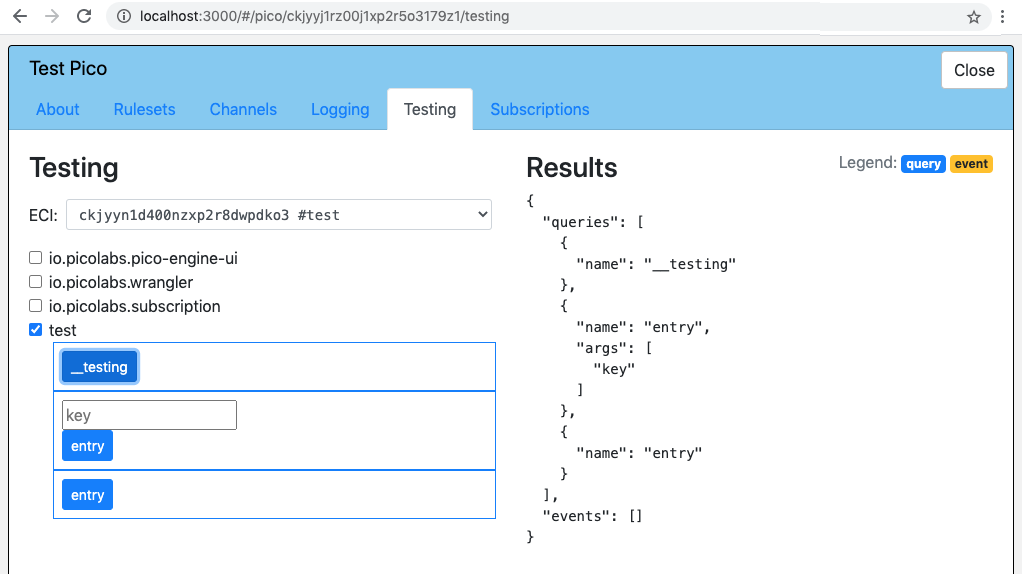
We register this ruleset and install it in the root pico. Now, when selecting the Testing tab for the root pico and clicking the box beside our ruleset identifier, we'll see the simple testing mechanism specified by the __testing map in the test ruleset:

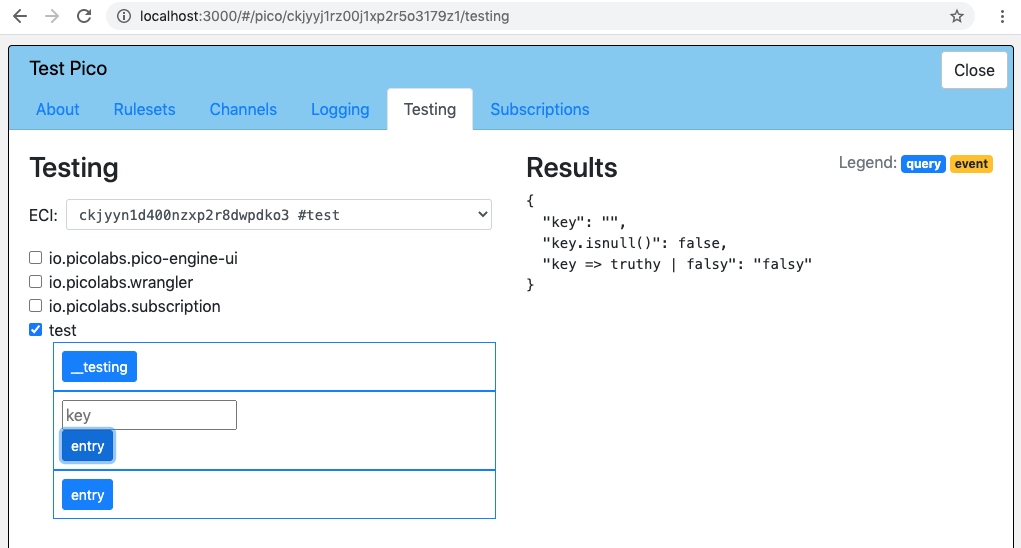
Invoking the function with an empty string
Without entering anything in the box with "key" as the placeholder, click on the the entry link to invoke the function. We'll see the results, showing that the value passed in as key is the empty string, which is not null, nor is it "truthy":

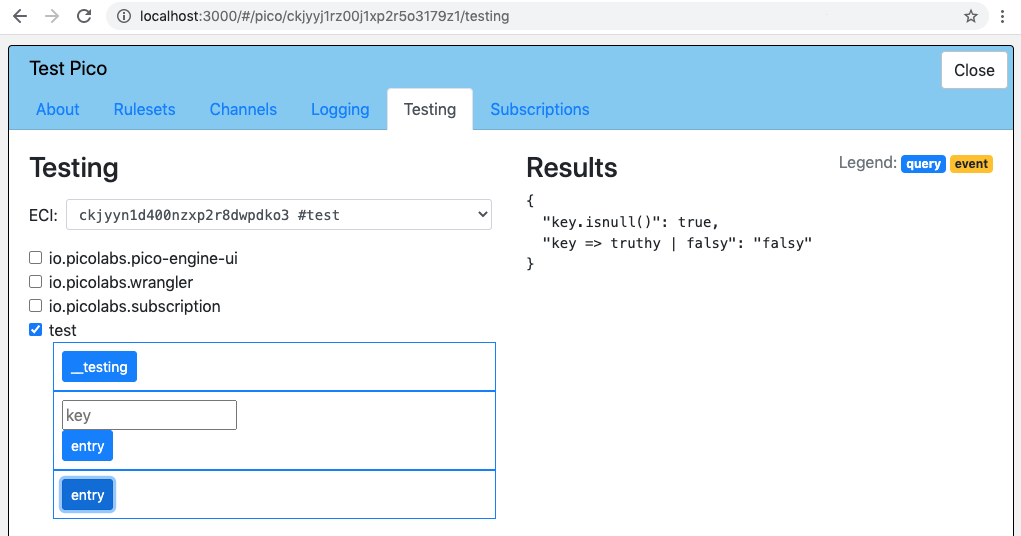
Invoking the function with a null
Next, click on the second entry link (which again invokes the function), and see the result, which is that the value passed in is null (since there wasn't one), which is indeed null, and also not "truthy":
More experiments
We can try passing different string values into the entry function, and in all cases we'll see them echoed, that none of them are null, and that they are all "truthy" (except for the empty string). Some interesting values to try are "0" (did you expect this to be "falsy" (it's not)), "true" and "false" (neither of which is null and both of which are "truthy")
Note that the user-supplied values in the __testing UI will be received as strings, unless JSON.parse() can convert them into something else, so you can work with other data types (numbers, truth values, maps, arrays, etc.) using the Testing tab. It would be instructive to try entering "0" (with quotes and without) to see the difference. Zero is falsy but any non-empty string is truthy.
Conclusion
It is very easy to stand up a simple ruleset to check out aspects of KRL which are not clear to you, or for which you cannot find documentation. Once you have learned what you need to know, you can simply discard the ruleset. Share what you have learned with others.
The Testing tab allows you to easily set up the UI needed to run your experiments.
Note that the user-supplied values in the __testing UI will always be received as strings, so if you need to work on other data types (numbers, truth values, maps, arrays, etc.) you may want to use the string operator decode(), or some other mechanism.
Adapting the tests in the Testing tab
For some specific uses of a test in the Testing tab, you might feel the need for variations. Some of these can be done by right-clicking on one of the text boxes and clicking "Inspect". Then, some simple edits of the generated HTML can let you adapt a test to your needs.
For example. for some testing during develpment of the technique for Triggering Events from Email Messages we needed to make the "to" box wider and, especially, the "text" box needed to be multi-lined in order to properly test the mail:parsed event.

Inspecting the "to" box showed this HTML (edited to elide the actual ECI) in the browser's developer tools.
| Code Block |
|---|
<form class="js-test sky-event" action="/sky/event/ECI/__testing/mail/parsed">
  <input type="text" name="to" placeholder="to">
  <input type="text" name="text" placeholder="text">
  <button type="submit">mail/parsed</button>
</form> |
Adding size="50" to the "to" input field and changing the "text" field from an input tag to a textarea tag will change the HTML shown in the developer tools to
| Code Block |
|---|
<form class="js-test sky-event" action="/sky/event/ECI/__testing/mail/parsed">
  <input type="text" name="to" placeholder="to" size="50">
  <textarea type="text" name="text" placeholder="text"></textarea>
  <button type="submit">mail/parsed</button>
</form> |
which, after some dragging of the lower-right corner of the textarea box, will look like this.
General notes
Another motivation for changing an input field into a textarea is when you need to paste in a very large string. A 27K string pasted into an input field will not work, but the size limit could be even smaller than that.
In keeping with RESTful principles, each event in the Testing tab is represented by a form using the POST method, while each query are represented by a form using the GET method.
Selecting a channel for a test
By default, each test will run using the pico's private ECI. You may wish to use a particular channel when running a test. To do this, after clicking on the Testing tab, but before opening one of the rulesets, select the desired channel from the dropdown list at the top of the page. To change channels, or if you forgot to select one, simply click on the Testing tab again to get a fresh slate of tests.