Rule Selection
A rule is selected when its event expression is satisfied. For primitive events, that means that the event is raised and the conditions around that event are met. The syntax for a select statement looks like this:
| Code Block | ||||
|---|---|---|---|---|
| ||||
select when <event_domain> <event_type> {<attr_name> <regexp>}*
[setting (<var>*)] |
For example consider the following select statement from a KRL rule:
| Code Block | ||||
|---|---|---|---|---|
| ||||
select when mail received |
In this event expression, mail is the event domain and received is the event type. Any rule containing this statement will be selected when events matching the event domain and type are raised. Of course event expressions can be more complicated:
| Code Block | ||||
|---|---|---|---|---|
| ||||
select when mail received from re#(.*)@windley.com# setting(user_id) |
This statement adds an attribute (from) and regular expression (re#(.*)@windley.com#) along with a setting clause to name the captured variable. You can have as many attribute checks as you want. The select statement shown above will only be satisfied when the event domain and type match and there is a attribute called from that has a value that matches the given regular expression.
Responding to Events
Of course, defining your own events is only half of the game. You also want to respond to them. The send_directive action provides for this. For example, the following action will send a directive named say with an attribute named something that has the value "Hello World".
| Code Block | ||||
|---|---|---|---|---|
| ||||
send_directive("say") with
something = "Hello World" |
A rule or ruleset can send zero or more directives to the endpoint as the result of a single event being raised. The endpoint will see them as JSON and can interpret them any way it wants. The developer's job is to
- Design the events that the endpoint will raise
- Design the directives that the endpoint will respond to
- Create an endpoint that does these things
- Write rulesets that the endpoint uses.
Of course, it's possible that a single endpoint might have multiple rulesets that use it from multiple developers trying to do different things.
Defining events that an endpoint can raise and directives that it can consume is similar to creating a protocol. Since the quintessential introductory example for a protocol is an echo server, this example shows one in KRL. We'll define the event domain to be echo and define two event types: hello and message. That means we need at least two rules, one for each event type. We could have more if we want to respond to different attributes (see code here for classic KRL and here for the node pico engine).
| Code Block | ||||
|---|---|---|---|---|
| ||||
rule hello_world is active {
  select when echo hello
  send_directive("say") with
    something = "Hello World"
}

rule echo is active {
  select when echo message input re#(.*)# setting(m);
  send_directive("say") with
    something = m
} |
The rule hello_world responds to the hello event by sending the directive named say with the attribute something set to "Hello World". The rule echo responds to an echo event with a attribute called input. That entire value of the input is captured and bound to the variable m. The echo rule sends a directive named say with the attribute something set to the value of m.
It's critical to note that the underlying KRE engine doesn't know anything about the event domain echo or the event types hello and message. We could define these to be anything we wanted and the example would work the same.
Endpoints
Of course, this ruleset with its understanding of the echo events and directives is useless without a corresponding endpoint to raise these events and consume the directives. Endpoints can be created in any number of different ways.
Using Perl
The following simple program is the demonstration program from the Kinetic::Raise Perl library.
| Code Block | ||||
|---|---|---|---|---|
| ||||
#!/usr/bin/perl -w
use strict;

use Getopt::Std;
use LWP::Simple;
use JSON::XS;

use Kinetic::Raise;

# must be an eci to a pico with a16x66 or similar installed
my $eci = 'XXXX-XXXX-XXXX-XXXX-XXXX-XXXX';

# global options
use vars qw/ %opt /;
my $opt_string = 'h?e:m:';
getopts( "$opt_string", \%opt ); # or &usage();

my $event_type = $opt{'e'} || 'hello';
my $message = $opt{'m'} || '';

my $event = Kinetic::Raise->new('echo',
			       $event_type,
			       {'eci' => $eci}
			       );

my $response = $event->raise({'input' => $message});

foreach my $d (@{$response->{'directives'}}) {
  if ($d->{'name'} eq 'say') {
    print $d->{'options'}->{'something'}, "\n";
  }
} |
This simple script uses a module called Kynetx::Raise that takes the relevant information about the event, creates the right ESL for the Kynetx event API, raises the event by calling the ESL and processes the response. You can see that it has the possibility of taking the event type from the command line with the -e switch. If none is given, the event type defaults to hello. Consequently running this program with no arguments results in the hello_world rule we defined above firing and the directive say "Hello World" being sent to the program which prints the message.
Running the program with the -e switch like so:
./demo_sky.pl -e message -m 'KRL programs the Internet!'
results in the string KRL programs the Internet! being printed in the terminal.
Using Node.js
This simple node javascript program follows the same specification as the Perl program.
| Code Block |
|---|
var args = require("minimist")(process.argv.slice(2));

var event_type = args.e || "hello";
var message = args.m || "";

var request = require("request");
// must be an eci to a pico with the echo_server ruleset or similar installed
var eci = "cj004fk1h0002emao22kqqtca";
var eid = "my-event-id";
var pico_engine = "localhost:8080";

var url = "http://"+pico_engine+"/sky/event/"+eci+"/"+eid+"/echo/"+event_type;
request.post(url,{form:{input:message}},function(err,response,body){
  JSON.parse(body).directives.forEach(function(d){
    if (d.name === "say"){
      console.log(d.options.something);
    }
  });
}); |
Using HTML and JQuery
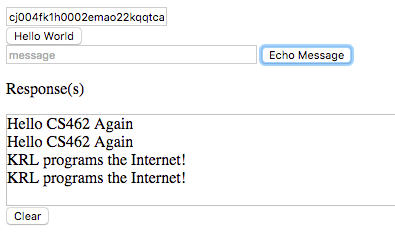
This simple single page application is also capable of acting as an endpoint for this ruleset (source here). It will allow you to send each of the events multiple times and collect the said responses.
| Code Block |
|---|
<!DOCTYPE HTML>
<html>
  <head>
  <title>Echo Endpoint</title>
  <meta charset="UTF-8">
  <style type="text/css">
    .hidden { display: none; }
    div { border: 1px solid silver; }
  </style>
  <script src="js/jquery-3.1.0.min.js" type="text/javascript"></script>
  <script type="text/javascript">
    $(document).ready(function(){
      var doSayDirectives = function(d){
        d.directives.forEach(function(dir){
          if (dir.name === "say") {
            $("#say").append(dir.options.something).append($("<br>"));
            $(".hidden").removeClass("hidden");
          }
        });
      };
      $("#hello-world").click(function(){
        var eci = $("#eci").val();
        var url = "sky/event/"+eci+"/hello-name/echo/hello";
        $.getJSON(url,doSayDirectives);
      });
      $("#echo-message").click(function(ev){
        ev.preventDefault();
        var eci = $("#eci").val();
        var m = $("#input").val();
        var url = "sky/event/"+eci+"/echo-message/echo/message?input="+m;
        $.getJSON(url,doSayDirectives);
      });
      $("#clear").click(function(){
        $("#say").text("");
        $(".output").addClass("hidden");
      });
    });
  </script>
  </head>
  <body>
    <input id="eci" placeholder="eci" size="25">
    <br>
    <button id="hello-world">Hello World</button>
    <br>
    <form>
      <input id="input" name="input" placeholder="message" size="40">
      <button id="echo-message">Echo Message</button>
    </form>
    <p id="heading" class="hidden output">Response(s)</p>
    <div id="say" class="hidden output"></div>
    <button id="clear" class="hidden output">Clear</button>
  </body>
</html> |
After clicking twice on the "Hello World" button, twice on the "Echo Message" button with the "KRL programs the Internet!" message, and once with a blank message, this SPA will look like this:
Using the Testing tab of the UI
If you modify your ruleset to include this (swagger-like) definition of the events, as the special name "__testing" (double underscore) in the "global" block of the ruleset (place this block after the "meta" block and just before the first rule)
| Code Block |
|---|
  global {
    __testing = { "events": [ { "domain": "echo", "type": "hello" },
                              { "domain": "echo", "type": "message",
                                "attrs": [ "input" ] } ] }
} |
and mention that name in a "shares" directive in the meta block of the ruleset
| Code Block |
|---|
  meta {
...
    shares __testing
} |
and refresh the Testing tab, you will see something like this
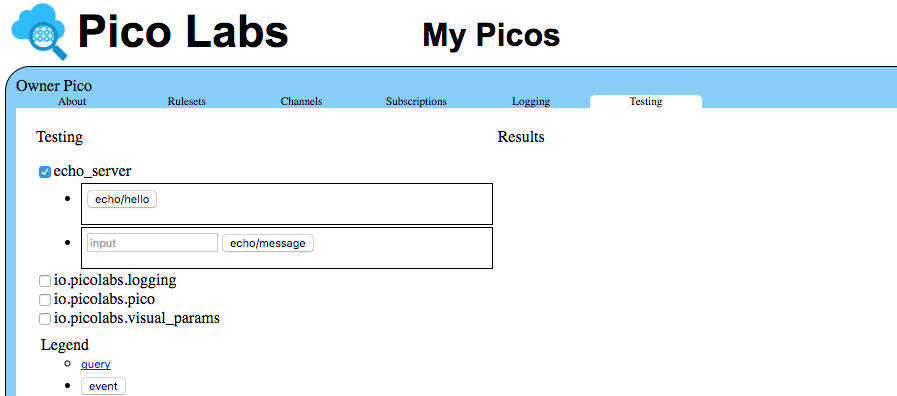
This tab then acts as an endpoint, and is capable of sending either of the events at the click of a button. It will respond to the "echo/hello" event by displaying the directives returned by the "hello_world" rule:
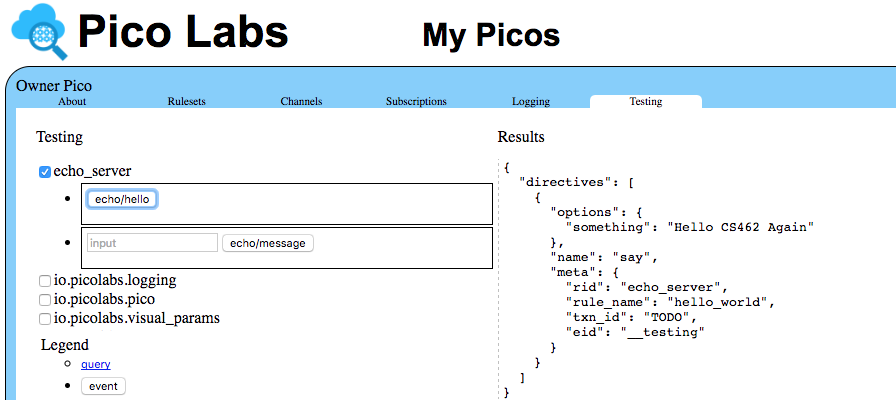
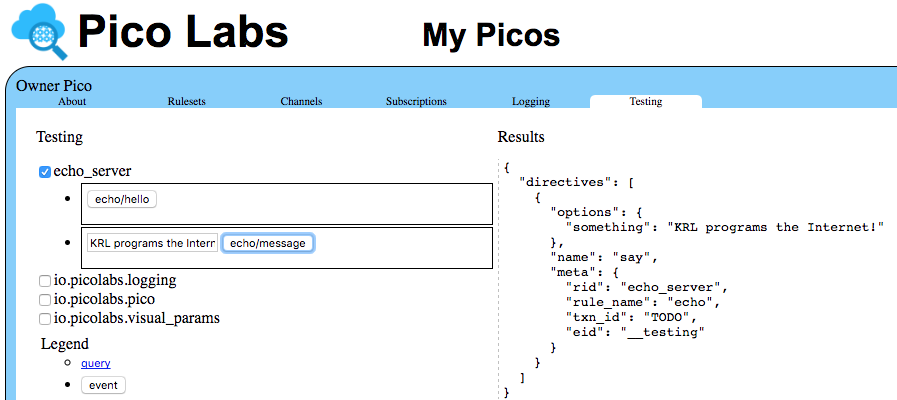
and to the "echo/message" event by displaying the directives returned by the "echo" rule:
Developer as endpoint
Finally, you as developer can manually perform the functions of an endpoint, by sending an event and consuming any returned directives by examining them. For example (line break added):
| Code Block |
|---|
$ curl http://localhost:8080/sky/event/cj08ain5t000ahqao8xbkrre9/curl-event/echo/hello
{"directives":[{"options":{"something":"Hello CS462 Again"},"name":"say","meta":
{"rid":"echo_server","rule_name":"hello_world","txn_id":"TODO","eid":"curl-event"}}]} |