...
After completing this lesson you will be able to do the following:
Use KRL to program a pico to serve as the "back end" for a single page application (SPA)
Use AJAX in the SPA to maintain state information in the pico
Use AJAX in the SPA to query for the state of the pico
Prerequisites
You should have completed the following lessons
Also, read the page on Creating an Echo Server, which has another example of a single page application, created "Using HTML and JQuery."
Contents
| Table of Contents | ||
|---|---|---|
|
Single Page Application
In this lesson, we will build a very simple single page application which maintains start and finish times. Each measurement or timing is identified by a number (with a leading "N" or "n") and a name.
...
You may use your favorite tools for building this front-end. Or you may simply copy and paste the HTML and JavaScript shown below for an Angular app.
Angular HTML
| Code Block | ||
|---|---|---|
| ||
<!doctype html>
<html>
<head>
<title>Timing</title>
<link href="//maxcdn.bootstrapcdn.com/bootstrap/3.2.0/css/bootstrap.min.css" rel="stylesheet">
<script src="//ajax.googleapis.com/ajax/libs/angularjs/1.2.19/angular.min.js"></script>
<script src="timing.js"></script>
<style type="text/css">
span.finished { cursor: pointer; color: blue; text-decoration: underline; }
</style>
</head>
<body ng-app="timing" ng-controller="MainCtrl">
<div class="row">
<div class="col-md-8 col-md-offset-2">
<div class="page-header">
<h1>Timing</h1>
</div>
<form ng-submit="addTiming()" style = "margin-top:30px;">
<input type="text" ng-model="number" placeholder="number" autofocus></input>
<input type="text" ng-model="name" placeholder="name"></input>
<button type="submit" focus-input>timing started</button>
</form>
<div ng-repeat="timing in timings | orderBy: '-ordinal'">
{{timing.number}} ·
{{timing.name}} ·
{{timing.time_out}} ·
{{timing.time_in}}
<span class="finished" ng-click="finished(timing.number)" ng-if="!timing.time_in">timing finished</span>
<span ng-if="!!timing.time_in">· {{timeDiff(timing)}}</span>
</div>
</div>
</div>
</body>
</html> |
...
Additionally, the code obtains the value for eci in line 17, and makes the initial call to the function getAll in line 44.
| Code Block | linenumbers | true
|---|
angular.module('timing', [])
.directive('focusInput', function($timeout) {
  return {
    link: function(scope, element, attrs) {
      element.bind('click', function() {
        $timeout(function() {
          element.parent().find('input')[0].focus();
        });
      });
    }
  };
})
.controller('MainCtrl', [
  '$scope','$http','$window',
  function($scope,$http,$window){
    $scope.timings = [];
    $scope.eci = $window.location.search.substring(1);

    var bURL = '/sky/event/'+$scope.eci+'/eid/timing/started';
    $scope.addTiming = function() {
      var pURL = bURL + "?number=" + $scope.number + "&name=" + $scope.name;
      return $http.post(pURL).success(function(data){
        $scope.getAll();
        $scope.number='';
        $scope.name='';
      });
    };

    var iURL = '/sky/event/'+$scope.eci+'/eid/timing/finished';
    $scope.finished = function(number) {
      var pURL = iURL + "?number=" + number;
      return $http.post(pURL).success(function(data){
        $scope.getAll();
      });
    };

    var gURL = '/sky/cloud/'+$scope.eci+'/timing_tracker/entries';
    $scope.getAll = function() {
      return $http.get(gURL).success(function(data){
        angular.copy(data, $scope.timings);
      });
    };

    $scope.getAll();

    $scope.timeDiff = function(timing) {
      var bgn_sec = Math.round(Date.parse(timing.time_out)/1000);
      var end_sec = Math.round(Date.parse(timing.time_in)/1000);
      var sec_num = end_sec - bgn_sec;
      var hours   = Math.floor(sec_num / 3600);
      var minutes = Math.floor((sec_num - (hours * 3600)) / 60);
      var seconds = sec_num - (hours * 3600) - (minutes * 60);

      if (hours   < 10) {hours   = "0"+hours;}
      if (minutes < 10) {minutes = "0"+minutes;}
      if (seconds < 10) {seconds = "0"+seconds;}
      return hours+':'+minutes+':'+seconds;
    }
  }
]); |
...
Once you have set up your pico engine, you can create a pico using the My Picos page "About" tab of the developer UI.
...
After clicking the "Add" button, you will see a link to the new pico.Install
...
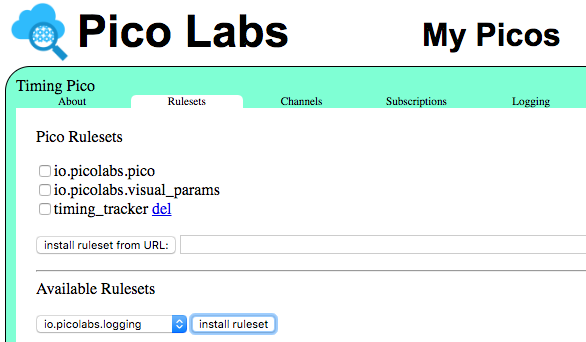
Click on that link and visit the Timing Pico's "Rulesets" tab. There you will install the timing_tracker ruleset (described in detail below). Enter this URL to its source code: https://raw.githubusercontent.com/Picolab/pico_lessons/master/spa/timing_tracker.krl
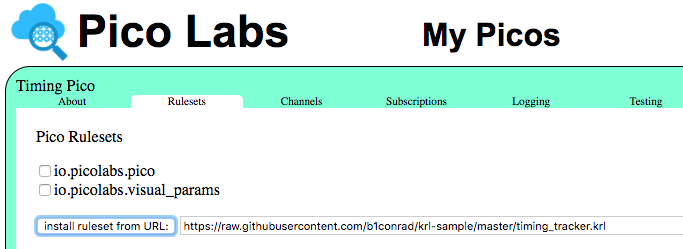
You will probably also find it informative to install the pre-registered logging ruleset, and enable logging in the "Logging" tab.
...
The final step in preparing your pico for use as the "back end" of the single page application is to create a channel for each timekeeper. Do this in the "Channels" tab.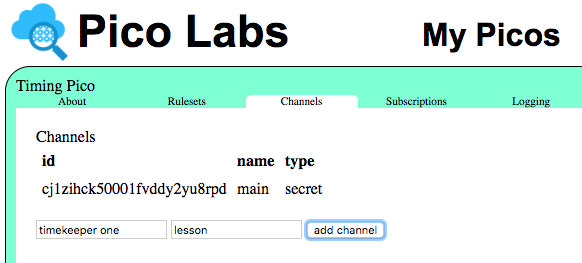
...
Once the channels have been created, copy a channel id (also known as an event channel identifier, or ECI) and use it to complete the URL for a timekeeper.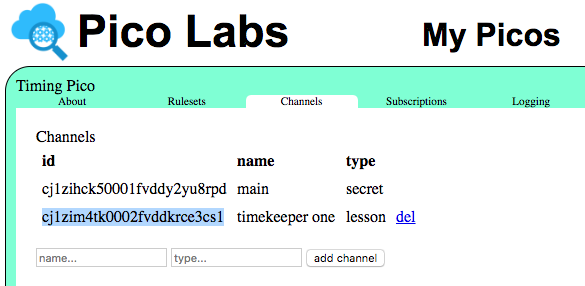
...
The Angular JavaScript code obtains the ECI from the query string of its initial URL. For this example, the URL used by timekeeper one would be
| Code Block |
|---|
http://localhost:8080/timing.html?cj1zim4tk0002fvddkrce3cs1ckcz14k5j000zyknld68x3ft6 |
and similarly for other timekeepers. Having a separate ECI for each timekeeper allows you to revoke access to the SPA for one timekeeper while allowing others to continue using it.
The Pico Ruleset
The ruleset shares (line 3) the function entries (defined in lines 6-8), which simply returns the values of an entity variable named ent:entries which will be maintained as a KRL map.
Since the function might be called by our SPA (or some other way) before it contains any entries we make sure it defaults to an empty map (line 7).
The rule timing_first_use defined in lines 10-16 will be selected every time the pico receives either the timing:started event or the timing:finished event. If ent:entries has a map, the rule will "fire" and preform the empty action (i.e. do nothing), and otherwise the notfired postlude will initialize ent:entries to an empty map. This rule will fire before any other rule which selects on either of those events because it appears first, lexically, in the ruleset.
Rule timing_started (lines 17-30) selects on event domain timing and type started when there is an event attribute number that matches the regular expression of line 18 (the letter "N" (or "n") followed by any number of leading zeros and at least one other digit). It extracts the digits of number as a number into the value named ordinal_string. In the rule prelude, a normalized key is built from the ordinal value. If there is already a timing with that key, the rule fires, performing no action. Otherwise, in its notfired postlude, the rule adds an entry to the map in ent:entries which names a map containing the data for this timing. Note that the element names in this map exactly match those expected by the Angular HTML code.
| Code Block | linenumbers | true
|---|
ruleset timing_tracker {
  meta {
    shares entries
  }
  global {
    entries = function() {
      ent:timings.defaultsTo({}).values()
    }
  }
  rule timing_first_use {
    select when timing started or timing finished
    if ent:timings then noop()
    notfired {
      ent:timings := {}
    }
  }
  rule timing_started {
    select when timing started number re#n0*(\d+)#i setting(ordinal_string)
    pre {
      key = "N" + ordinal_string
    }
    if ent:timings >< key then noop()
    notfired {
      ent:timings{key} := {
        "ordinal": ordinal_string.as("Number"),
        "number": event:attr("number"),
        "name": event:attr("name"),
        "time_out": time:now() }
    }
  }
  rule timing_finished {
    select when timing finished number re#n0*(\d+)#i setting(ordinal_string)
    pre {
      key = "N" + ordinal_string
    }
    if ent:timings >< key then noop()
    fired {
      ent:timings := ent:timings.put({[key,"time_in"],} := time:now())
    }
  }
} |
Rule timing_finished (lines 31-40) selects when the event with domain timing and type finished occurs, provided it has an attribute number matching the regular expression in line 32. If it does, the rule is selected with ordinal_string set to the number. In In the rule prelude, a normalized key is built from the ordinal value. If there is already a timing with that key, the rule fires, performing no action, and in its fired postlude sets postlude sets (to the current time) an attribute time_in on the map for that timing.
In the "RulesetsTesting" tab for the pico, you can check the box beside the timing_tracker ruleset to labelled "entries" to see its entity variable. The value might look something like this (lightly edited for readability):
| Code Block |
|---|
ent:timings= {"N1":[ {"ordinal":1,"number":"n1","name":"Nick Angell","time_out":"2017-04-26T22:35:48.446Z","time_in":"2017-04-26T22:39:47.998Z"}, "N2": {"ordinal":2,"number":"n2","name":"Connor Grimm","time_out":"2017-04-26T22:36:12.665Z"} }] |