| Table of Contents | ||
|---|---|---|
|
The My Picos page will be at http://localhost:8080/ , assuming that you have used the default port and are running the pico engine on your own machine.
...
- About tab contains the pico's identifier (ID) and secret event channel identifier (ECI), allows you to change it's display name, and/or color. This tab also shows any child picos, the parent pico if it has one, and allows you to create child picos, giving each one a display name and color.
- Rulesets tab contains a list of rulesets installed in this the pico. A checkbox to the left of each ruleset identifier (RID) when checked will allow you to see the entity variables of this ruleset which are stored in the pico. There is also an input box that you can use to install a ruleset from a raw KRL source code URL. Finally, there is a list of rulesets which are registered in the pico engine, but not installed in your the pico. If it makes sense, you can select one of these and install it into the pico.
- Channels tab shows the list of ECI's which can be used to contact the pico. Normally, the main admin secret ECI is never used by outside applications. Instead you use the input boxes in this tab to create new channels for separate purposes. This tab also allows you to delete channels which you have previously created. Doing so revokes the ability of outside applications to use the ECI again.
- Subscriptions tab shows the list of subscriptions in which the pico participates. Checking the box shows more detail about the subscription. It There is planned to add a set of input boxes to on this tab to allow you to initiate subscription requests, and respond to pending subscription requests.
- Logging tab allows you to see detailed logging information concerning events and queries sent to the pico. To enable logging you must (using the Rulesets tab) install the
io.picolabs.loggingruleset in the pico, and then turn logging on. - Testing tab has a list of rulesets which are installed in the pico. Checking the box beside a ruleset RID opens a list of forms which will permit you to supply arguments and send queries and/or events to the pico. The results of these queries and events will be displayed on the right side of the tab's display area.
How to specify tests in the Testing tab
...
- .
...
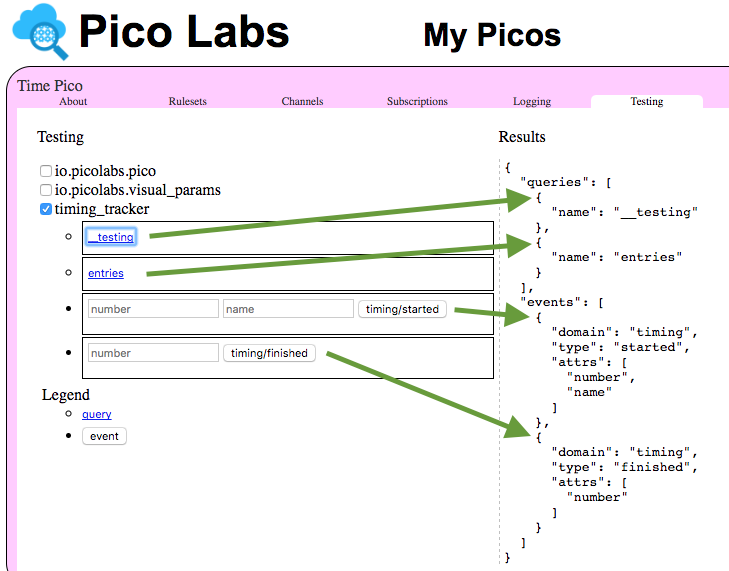
For example, consider this annotated screenshot of a Testing tab. The pico has three rulesets installed. Only the ruleset whose RID is timing_tracker has its checkbox checked, so only its tests are showing. We just clicked on the link "__testing" so the Results area is showing the __testing map itself.
Notice that this ruleset has defined four tests:
- the query for
__testing - the query for
entries - the
timing/startedevent with two event attributes, namednumberandname - the
timing/finishedevent with one event attribute, namednumber
By following the green arrows you can see which part of the __testing map specified each test.
The timing_tracker ruleset meta and global blocks are shown here:
| Code Block |
|---|
ruleset timing_tracker {
  meta {
    shares entries, __testing
  }
  global {
    entries = function() {
      ent:timings.defaultsTo({}).values()
    }
    __testing = { "queries": [ { "name": "__testing" },
                               { "name": "entries" } ],
                  "events": [ { "domain": "timing", "type": "started",
                                "attrs": [ "number", "name" ] },
                              { "domain": "timing", "type": "finished",
                                "attrs": [ "number" ] }] }
} |
The name __testing is bound to a map with two keys, "queries" and "events", each of which is an array of maps.
Each query map has a key "name" for the shared name bound to a function or value, and if needed, a key "args" whose value is an array of argument names for a function.
An event map has keys "domain" and "type" for the domain and type of the event, and if needed, a key "attrs" whose value is an array of attribute names.
Adapting the tests in the Testing tab
For some specific uses of a test in the Testing tab, you might feel the need for variations. Some of these can be done by right-clicking on one of the text boxes and clicking "Inspect". Then, some simple edits of the generated HTML can let you adapt a test to your needs.
For example. for some testing during develpment of the technique for Triggering Events from Email Messages we needed to make the "to" box wider and, especially, the "text" box needed to be multi-lined in order to properly test the mail:parsed event.
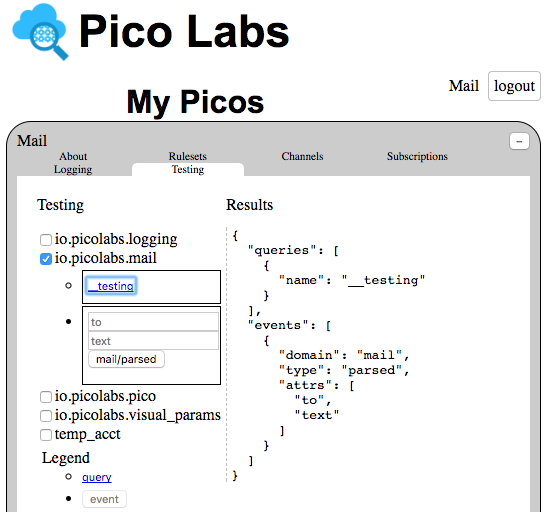
Inspecting the "to" box showed this HTML (edited to elide the actual ECI) in the browser's developer tools.
| Code Block |
|---|
<form class="js-test sky-event" action="/sky/event/ECI/__testing/mail/parsed">
  <input type="text" name="to" placeholder="to">
  <input type="text" name="text" placeholder="text">
  <button type="submit">mail/parsed</button>
</form> |
Adding size="50" to the "to" input field and changing the "text" field from an input tag to a textarea tag will change the HTML shown in the developer tools to
| Code Block |
|---|
<form class="js-test sky-event" action="/sky/event/ECI/__testing/mail/parsed">
  <input type="text" name="to" placeholder="to" size="50">
  <textarea type="text" name="text" placeholder="text"></textarea>
  <button type="submit">mail/parsed</button>
</form> |
which, after some dragging of the lower-right corner of the textarea box, will look like this.
...