...
Note: Manifold is currently under heavy development and is subject to change. This is meant to be a guide for Manifold and Manifold app developers.
Installing Manifold, preparing the root pico for authentication
...
- Start an instance of the pico engine from a command line with the initial host set to "http://localhost:8080", or whatever host you are developing on. This is an example command command: "PICO_ENGINE_HOST=http://localhost:8080 pico-engine". If you are using a different port, remember to change the host accordingly and set the port with "PORT=<your port number>" (Ensure that your engine is of version 0.4546.2 1 or higher). An example of hosting your pico engine on 8080 but changing your port would look like the following command: "PICO_ENGINE_HOST=http://localhost:8080 PORT=<your port number> pico-engine".
- Clone or download the following Github Repository: Manifold Repository.
Enter the directory downloaded in step 2 on your local machine from command line and type "npm install"
this, which will then initiate an installation of the required dependencies. Once this process finishes enter "npm start" this should start an instance of the Manifold. (You will have 2 separate
instancesprograms running now, one for manifold, the other for the pico engine). By default
thisManifold starts on localhost port 3000.
Warning If you have previously signed into a Manifold service before, then it is possible that you will be redirected to manifold.picolabs.io. If this happens, simply navigate back to localhost:3000, click on the user profile in the top right, then click logout. This will allow you to sign in again using your google account.
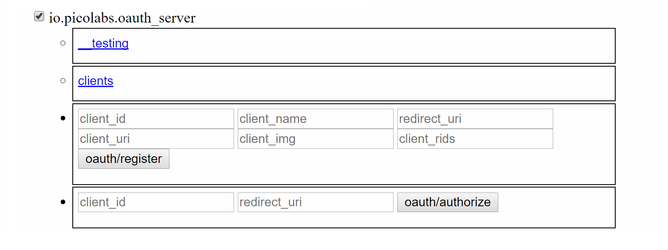
- In your browser, open the page for your pico engine (by default: localhost:8080) and install the following rule-sets rulesets on the root pico: (they should all be visible under the Rulesets tab in the Available Rulesets dropdown-menu). When you are installing rulesets into your pico from GitHub, make sure that you are copying and pasting from the rulesets raw source URL.
- io.picolabs.oauth_servergoogle_signin (found in the folder "Manifold_krl" in the Manifold Repository)
- io.picolabs.account_management
- io.picolabs.owner_authentication
authentication (The io.picolabs.account_management ruleset will automatically install the io.picolabs.owner_authentication ruleset.) See below for the needed password once installed.
- io.picolabs.oauth_servergoogle_signin (found in the folder "Manifold_krl" in the Manifold Repository)
When installed, the pico engine page will refresh requiring you to login before doing anything else. The default root pico id and password are: "root" and "toor" respectively. If you want to add your own account, enter the Testing tab of your root pico, click the checkbox button for "io.picolabs.account_management" enter a new name and password and click the "owner/creation" button. To access your new account, logout from the top right of your browser window and enter the recently created credentials.)
5. Register the following rulesets with your engine (but do not install them on your pico yet):
- io.picolabs.manifold_owner
- io.picolabs.manifold_pico
- io.picolabs.thing
The . The first few rulesets can be found in the folder "Manifold_krl" at the root of the Manifold project you cloned in step 2:
- io.
...
Registering with the OAUTH server
...
- picolabs.manifold_owner
- io.picolabs.
...
- manifold_pico
- io.picolabs.thing
- io.picolabs.safeandmine (located in Picolab/SafeAndMine on Github)
- io.picolabs.journal (located in Picolab/ManifoldApps/JournalApp on Github)
- io.picolabs.profile
- io.picolabs.notifications
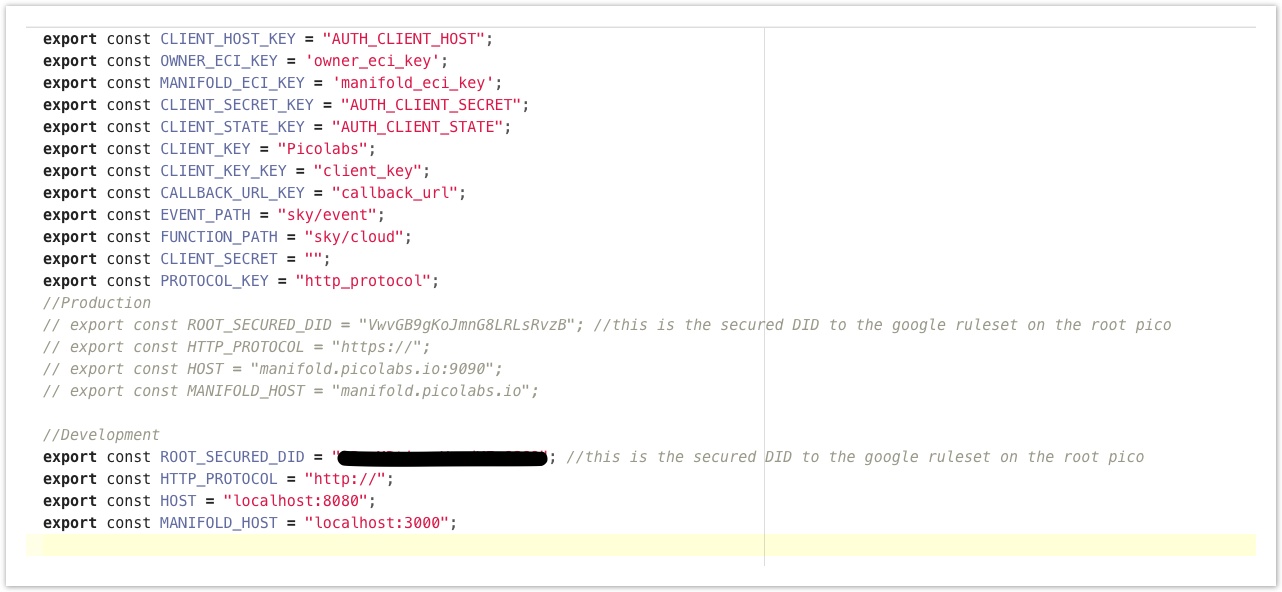
Edit config.js
- Open The Manifold project in your favorite text editor
- Open /src/utils/config.js
- Comment out the production section of config.js, and uncomment the development section
- Open your root pico on localhost:8080 (or wherever your engine is running), open the channels page, find the ECI/DID that has the policy "only allow google owner_did_requested events". If you cannot find this DID, make sure the io.picolabs.google_signin ruleset is installed
- Copy the above ECI/DID into ROOT_SECURED_DID in the config.js file.
- Edit any other fields in the config file under the development section
Your config file should look something like this:
Logging into Manifold
...
In a separate tab, open the manifold page (by default address: localhost:3000/#/login)
...
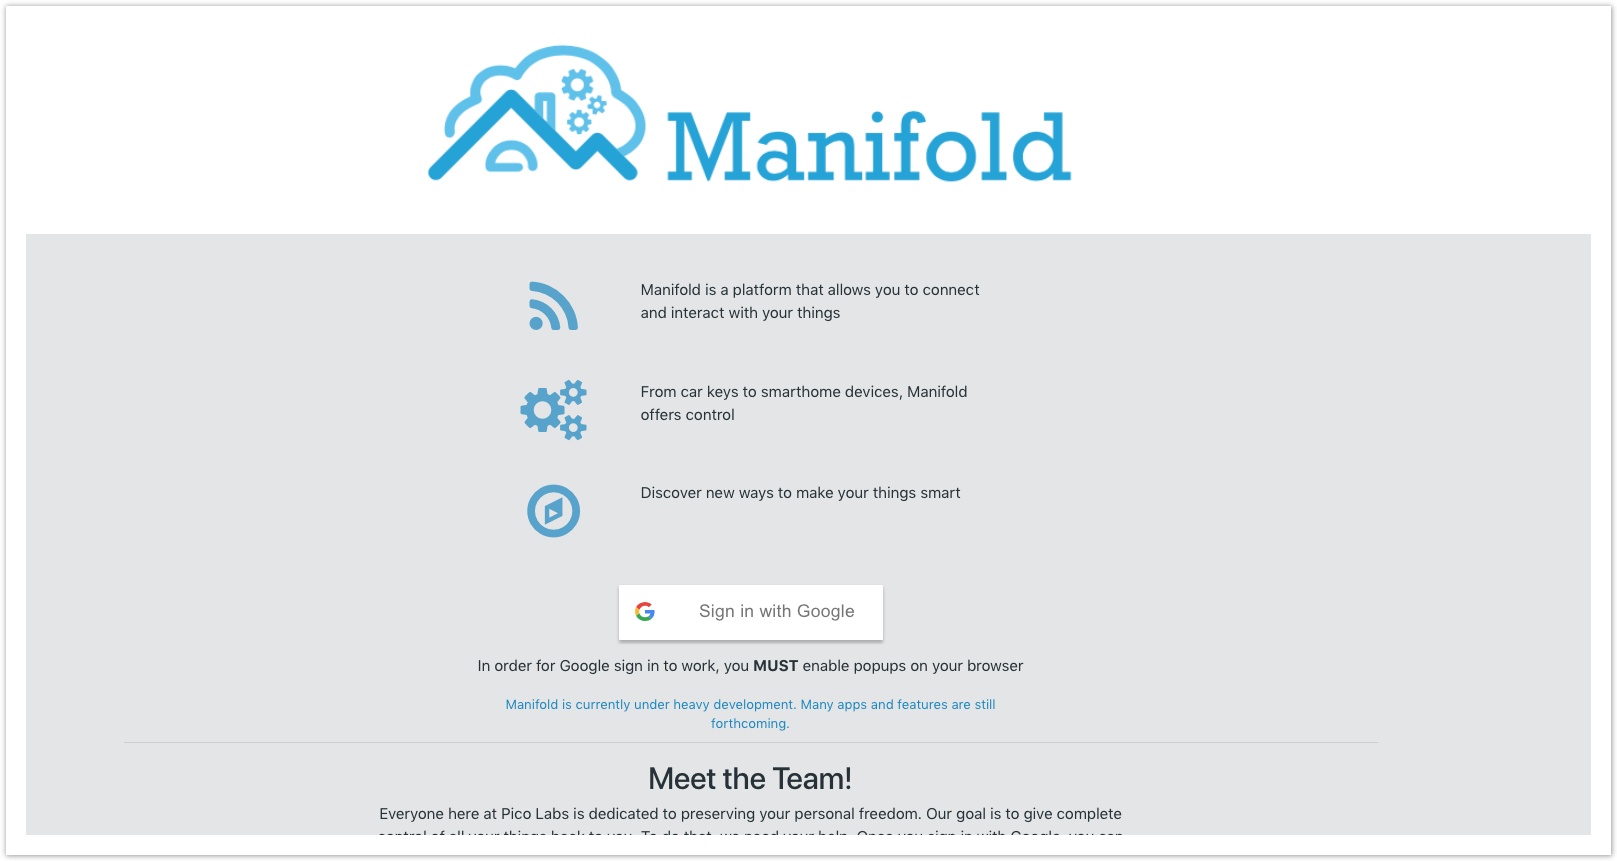
If everything was done correctly, clicking on the Sign in with Google button should navigate you to the Manifold landing page after signing in. Note: Once you are signed in, an internet connection is no longer necessary.
Also confirm that your pico engine has a child pico of the root which is named with a long string. This is your owner pico. Your owner pico should then have a child pico called Manifold. This owner/Manifold pico pairing exists for every google account that signs in using your pico engine. This is what it should look like, ignoring any other lines: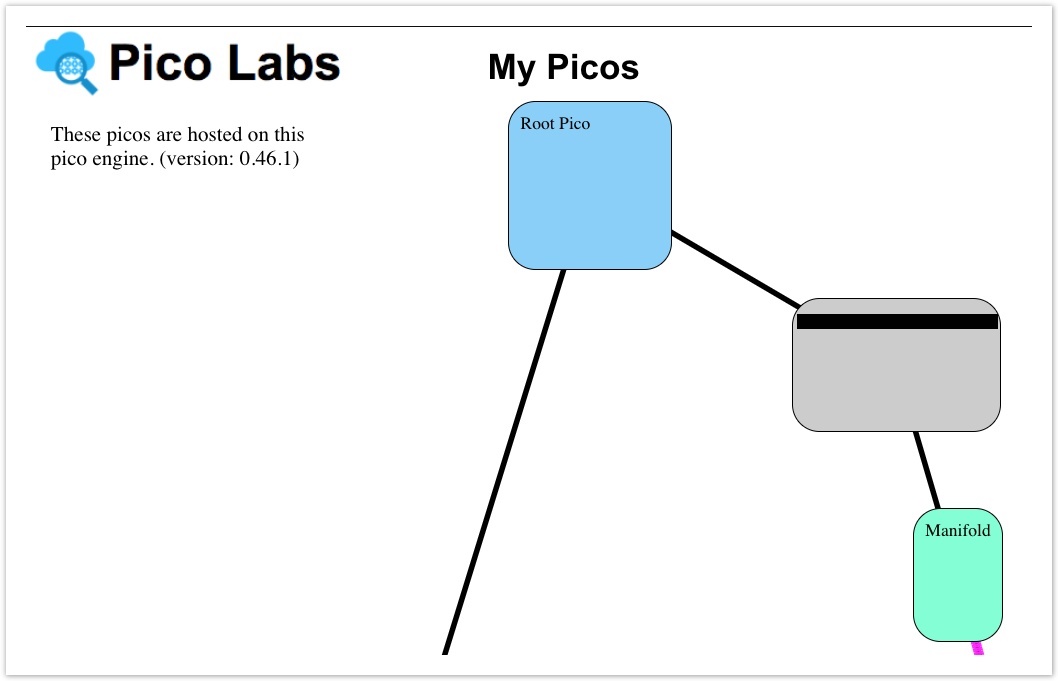
You are now ready to develop Manifold apps!
Updating Manifold
You can now enter your text editor and change the local Manifold files, the program will automatically detect these changes and display them.
...