Copy of Pico-Based Systems Lesson
Learning Objectives
After completing this lesson you will be able to do the following:
- Explain picos and how children and parent picos work
- Use the UI to create and delete child picos.
- Create and delete child picos programmatically.
- Install a ruleset in a child pico both manually and programmatically.
Prerequisites
You should have completed the following lessons
Contents
Pico Children
One of the important features of programming with picos is creating children. Solving programming problems with picos usually involves creating a system of picos that cooperate to solve the problem. This lesson introduces the concept of pico life-cycle management.
The pico that is created when your pico-engine started for the first time is called the "root" pico.
- Every pico except the root pico has a parent.
- You can create as many child picos as you like.
- Picos can be the children of other child picos and so on.
Creating Children Using the UI
You can use the UI to manage child picos.
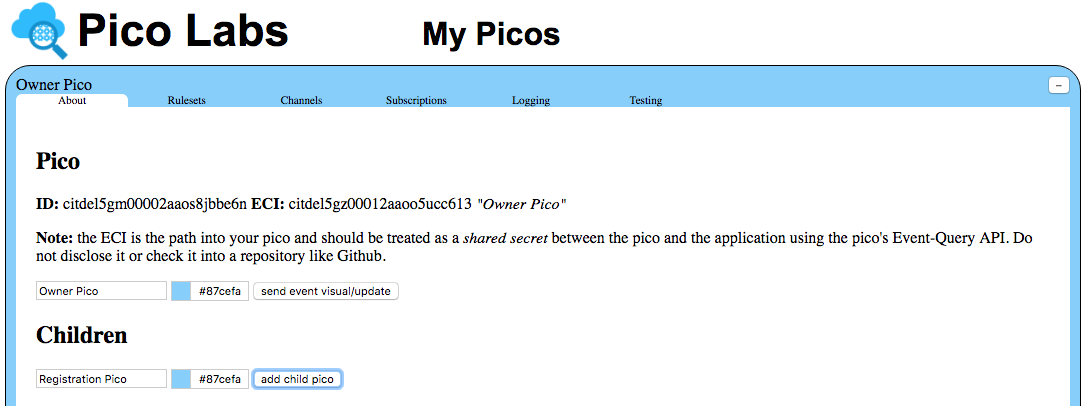
Start by clicking on the "About" tab for your owner pico and then clicking the "add child pico" button, having provided a display name and, if you wish, a different color. In this lesson and the next, we'll be considering a system of picos which implement a registration system, so let's call the child "Registration Pico".
Here is a screenshot just before clicking the button:
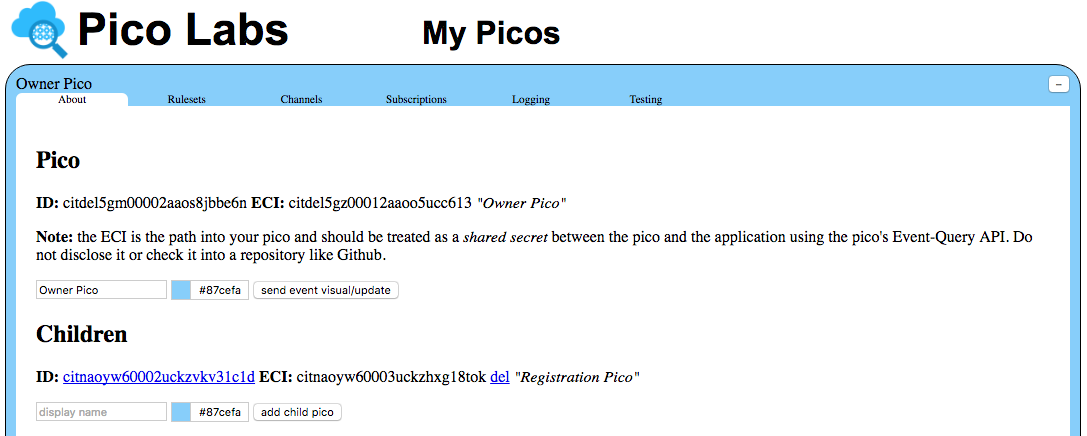
And after. Notice the new child pico has a (randomly assigned) identifier and event channel identifier (ECI).
Visiting a Child Pico
Click on the ID link of the "Registration Pico" to see the "About" tab for this new child pico.
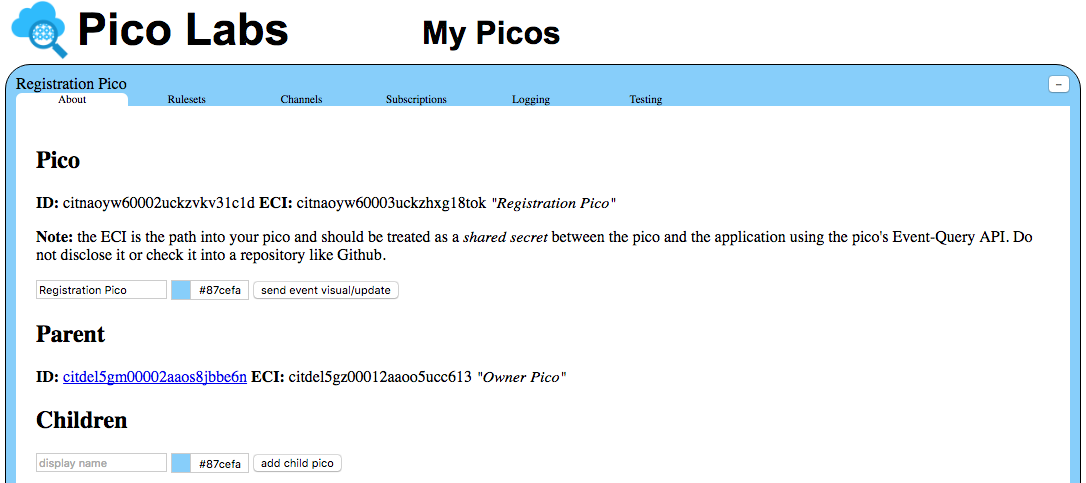
Notice that, while the root pico doesn't have a parent, this pico does.
For practice, create a child pico for the Registration Pico, naming it "Section Collection Pico" and giving it a different color.
Seeing the parent-child relationship
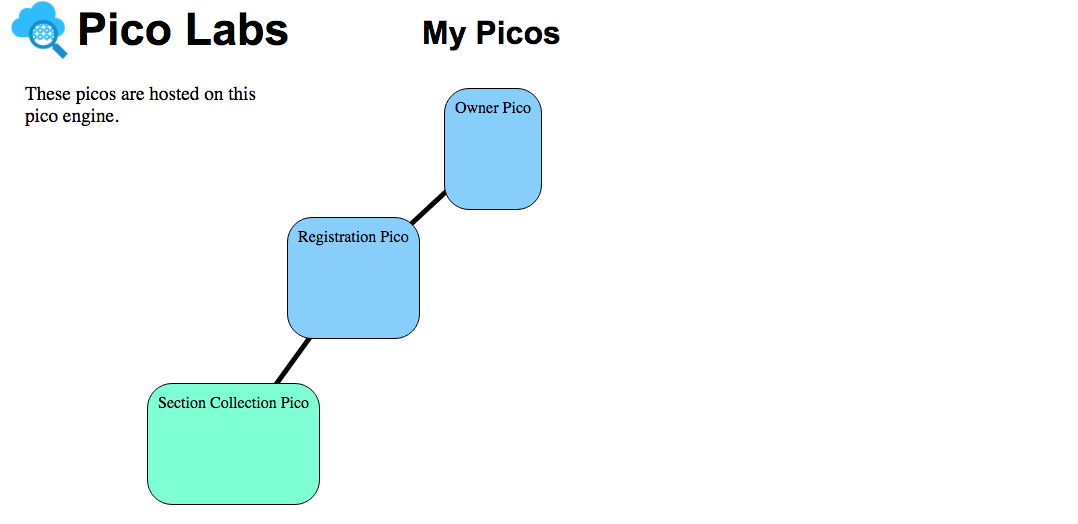
Click on the minus sign (actually, an en-dash) in the upper-right corner to see the layout of the pico collection so far. It should look something like this, after you move the picos around a bit:
Deleting child picos using the UI
You may have noticed in the "About" tab, beside the name of the picos you have created, that there is a link labelled "del". This allows you to manually delete the pico.
For practice, create another child pico, starting at a pico of your choice and then delete it. Currently, the UI does not allow you to delete a pico which has children (until you first delete all of its children, etc. recursively).
Creating Children Programmatically Using Wrangler
One of the hallmarks of picos is that they can create other picos programatically. In this section, we'll write rules that manage the pico lifecycle.
The following diagram gives an overview of the application we will use as a running example in this and the next few lessons. It shows parent-child relationships only. In the next lesson we'll learn about other kinds of relationships among picos.
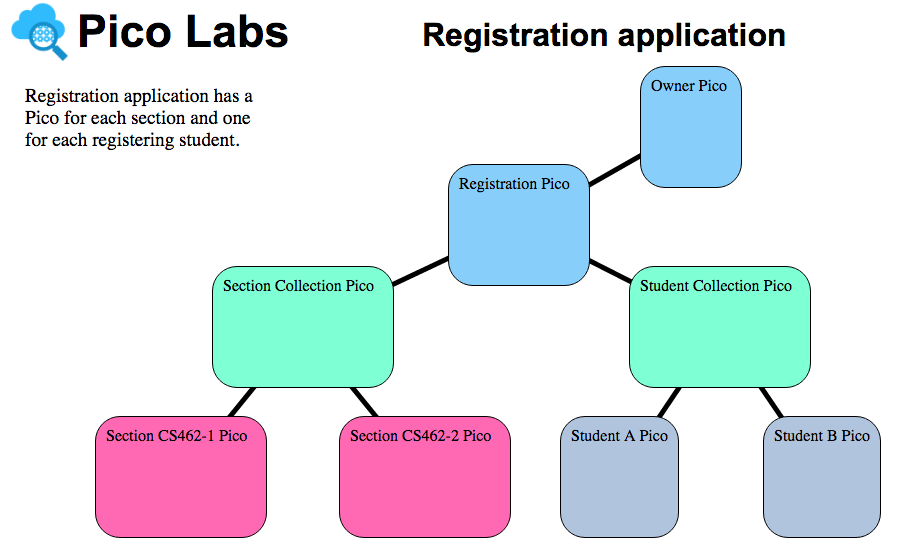
The "Root Pico" is created when a pico-engine starts for the first time. We have already created two of these picos, manually. You could go ahead, if you like, and also create the "Student Collection Pico" using the UI.
However, the two other kinds of picos (for individual sections and students) will be created programmatically by the respective collection picos, as needed. The diagram shows only two of each, but in practice there could be thousands of each kind, with each kind managed by the corresponding collection pico.
Our next step will be to write a KRL ruleset for the "Section Collection Pico". The purpose of this ruleset will be to manage its children, and serve as a sort of directory for them.
This pico will expect events from the "Registration Pico" (which orchestrates the entire application) informing it that a pico is needed for a particular section. When the rule evaluates, it will create the section pico and see that it is properly initialized, and will then send an event back to the registration pico informing it of the ID and ECI of the new section pico when it is ready for use. We'll complete the process of connecting the section pico to other picos which need it in the next lesson on subscriptions. For example, student A might need a direction communication channel with section CS462-1, and this (pair of) channels is called a "subscription".
A very similar ruleset will be needed for the "Student Collection Pico" and this will be left as an exercise.
Create a new ruleset named, say, "app_section_collection" that includes this rule:
  rule section_needed {
    select when section needed
    pre {
      section_id = event:attr("section_id")
      exists = ent:sections >< section_id
      eci = meta:eci
    }
    if exists then
      send_directive("section_ready", {"section_id":section_id})
    notfired {
      ent:sections := ent:sections.defaultsTo([]).union([section_id]);
      raise wrangler event "child_creation"
        attributes { "name": nameFromID(section_id), "color": "#ffff00" }
    }
  }
Let's take this opportunity to review the various parts of a rule definition:
Line 1 names the rule, in this case "section_needed"
Line 2 allows the pico-engine to select which events will cause this rule to be evaluated: those with domain "section" and type "needed"
Lines 3-7 constitute the rule's "prelude" which binds local* names to values
Line 4 binds the local name "section_id" to the event attribute named "section_id"
Line 5 binds the local name "exists" to the result of the Boolean expression. The operator "><" is the membership** operator
Line 6 binds the local name "eci" to the ECI of the event that is currently being processed (very meta)
Lines 8-9 constitute the rule's "condition/action" and sends a directive if "exists" is bound to "true"
Lines 10-15 constitute the rule's "postlude". In a postlude, we can mutate entity variables and raise events
Lines 11-14 will execute when the rule's condition is not*** met. That is, when the id passed in is not already in the entity variable (see line 5)
Line 11 assigns a new value to the entity variable, "union-ing" in the new "id". If the entity variable has not yet been assigned a value, it will start out as an empty array.
Lines 12-14 raises an event, with domain "wrangler" and type "child_creation". This event is expected by the ruleset named "io.picolabs.wrangler" using the same rule that runs when you create a child pico manually.
* local in the sense of being lexically (and temporally) scoped to this rule (execution)
** the membership operator is described in the page Predicate Expressions
*** when the rule's condition evaluates to true, we say the rule has "fired". otherwise, when the condition evaluates to false, the rule has "not fired"
Notice that the rule uses a function named "nameFromID" which is simply defined, in the "global" block of the ruleset, as
    nameFromID = function(section_id) {
      "Section " + section_id + " Pico"
    }
Define a "__testing" object, such as this one
__testing = { "events": [ { "domain": "section", "type": "needed", "attrs": [ "section_id" ] } ] }
in the "global" block of your ruleset. Be sure the ruleset "shares" it in the "meta" block. With this in place, once you have validated and installed your ruleset, you'll be able to refresh the "Testing" tab of the "Section Collection Pico" and have a UI for adding section picos by sending events to your pico, which will be handled by your ruleset.
To install your ruleset in the section collection pico, visit its "Rulesets" tab, enter the URL to its KRL source code, and click the "install ruleset from URL" button beside your ruleset URL.

Use this UI to send the event for section_id "CS462-1" and verify that the id has been added to the entity variable by refreshing the "Rulesets" tab.

Minimize the section collection pico. This will reveal the newly-created child pico.

You can position it at will, and note that it will remain connected to its parent by a parent-child link.
Congratulations! You can now create and delete child picos manually, using the UI. You also know how to write KRL code to create child picos as needed.
What about race conditions?
An astute reader will have noticed this pattern, shown here with some excerpts as a kind of pseudo-code:
exists = ent:sections >< section_id                // is this id in the array?
if exists then ...                                 // if so, fine
else                                               // if not,
ent:sections := ent:sections.union([section_id])   // add this id to the array
This looks a lot like a critical section which would need careful attention. What if several events are received concurrently, for the same section id?
However, this is taken care of for us by the design of KRL. When an event triggers a rule, that rule will run to completion, and no other event for the pico will be considered until it has finished. Not only does a pico encapsulate its state, it also synchronizes demands on it. In this case, all of the actions in the code block shown above will complete as an atomic operation. Only then will the pico consider the next event on its event queue.
Applications variable accesses are also synchronized safely.
Listing the Children
We can use the Wrangler function children() to get a list of the children. First, we'll need to declare our intention to use the io.picolabs.wrangler ruleset as "wrangler". This is done by adding this line to the meta block:
use module io.picolabs.wrangler alias wrangler
Here's a function that uses it within the test ruleset:
showChildren = function() {
  wrangler:children()
}
This function is nothing but a wrapper. You don't need to wrap Wrangler functions to use them within the ruleset, but we do if we want to make them visible via the Sky Cloud API for the pico. We also have to declare that our ruleset shares the function in the meta block.
This allows the functions named in the provides pragma to be seen in the pico's query API. Now we can call showChildren() using the "Testing" tab, assuming we have updated the ruleset's __testing object.
Maintaining information about child picos
So that we can interact with section picos, we will need access to their pico identifiers and event channel identifiers.
As we do this, let's change our representation from a simple list (array) of section identifiers. Instead, let's use an object containing objects named by the section identifier. To be concrete, instead of ent:sections having a simple array of string section identifiers like
[ "CS462-1", "CS462-2" ]
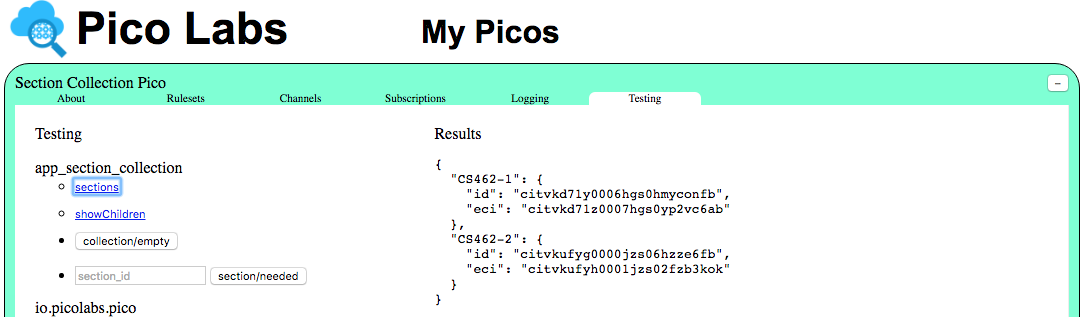
it will need to look like this
{
  "CS462-1": {
    "id": "citvkd71y0006hgs0hmyconfb",
    "eci": "citvkd71z0007hgs0yp2vc6ab"
  },
  "CS462-2": {
    "id": "citvkufyg0000jzs06hzze6fb",
    "eci": "citvkufyh0001jzs02fzb3kok"
  }
}
so that we are storing the ID and ECI of each of the child section picos.
Did you have a rule in your app_section_collection ruleset to empty out the list of sections? If not, create one, or modify yours so that it treats the empty collection as an empty object, instead of an empty array.
  rule collection_empty {
    select when collection empty
    always {
      ent:sections := {}
    }
  }
Using two rules for the same event
There are two possibilities when a section pico is needed. It might already exist, or we might need to create it. Let's use two rules. Replace your section_needed rule with this one for the case where the section already exists:
  rule section_already_exists {
    select when section needed
    pre {
      section_id = event:attr("section_id")
      exists = ent:sections >< section_id
    }
    if exists then
      send_directive("section_ready", {"section_id": section_id})
  }
And, let's use this rule for the case where the section pico needs to be created.
  rule section_needed {
    select when section needed
    pre {
      section_id = event:attr("section_id")
      exists = ent:sections >< section_id
    }
    if not exists
    then
      noop()
    fired {
      raise wrangler event "child_creation"
        attributes { "name": nameFromID(section_id),
                     "color": "#ffff00",
                     "section_id": section_id }
    }
  }
This is quite similar to the first version of this rule. The differences are that, first, we are not yet recording the information about the new section pico, because it has not yet been created so that information is not available. The second difference is that we are passing the section id as an additional event attribute.
Wrangler will then create the new pico, and record the parent-child relationship between the "Section Collection Pico" and its new child pico. Then, wrangler is written to send an event from the child pico to its parent, using the code shown here. Note that the code shown below already exists in the wrangler ruleset. Do not add it into your ruleset.
event:send({ "eci"   : event:attr("parent_eci"),
             "domain": "wrangler", "type": "child_initialized",
             "attrs" : event:attrs })
/*
The event:attrs object looks like this:
{
  // attributes provided by wrangler
  "parent_eci": <eci of parent>,
  "id" : <new child's id>,
  "eci": <new child's secret eci>,
  "rids_to_install": <array of rulesets installed on creation>,
  // attributes you provided in the child_creation event passed through
  "name": <the original provided name YOU gave>,
  "color": <your provided color string>,
  "section_id": <section_id you provided>
}
*/
Info
For more information on the wrangler operating system and different events you can listen in on and what additional attributes you can provide, check out the wrangler documentation.
You can add a rule in your app_section_collection ruleset to react to the wrangler child_initialized event. Your code might look something like this.
  rule store_new_section {
    select when wrangler child_initialized
    pre {
      the_section = {"id": event:attr("id"), "eci": event:attr("eci")}
      section_id = event:attr("section_id")
    }
    if section_id.klog("found section_id")
    then
      noop()
    fired {
      ent:sections := ent:sections.defaultsTo({});
      ent:sections{[section_id]} := the_section
    }
  }
Having made these changes, you can go into the UI and in the "Testing" tab of the "Section Collection Pico" clear the sections, and in the "About" tab manually delete any picos you had created previously. You should also trigger the "collection/empty" event to re-initialize the ent:sections entity variable.
Now, create a couple of section picos, and verify that you are persisting full information about each one. We have left the writing of a function named sections as an exercise (be sure to add it to the shares and make an entry for it in the __testing structure).
Installing a ruleset in a child pico
Wrangler is prepared to respond to an event, wrangler/install_rulesets_requested, which can be used to install one or more rulesets in a pico. If you checked out the wrangler docs, you'd also notice that the wrangler/child_creation event accepts an attribute called rids, which is an array of rulesets to install upon creation in addition to the operating system rulesets.
Why would we want to install other rulesets into each section pico? Rulesets represent the desired behavior in response to events that we would expect from that pico. Picos are device shadows for real life things/objects, meaning they digitally represent some physical thing (in this case they represent sections and students). So, in simpler terms, if we want a Section Pico to accurately represent a real section, we install the "app_section" ruleset into it that provides all the desired functionality. The same could be done for the Student Picos, but with a ruleset maybe called "app_student".
Make an empty ruleset named "app_section" (you could name it any reasonable thing you like). This can be accomplished in the "Engine Rulesets" page, by entering app_section in the box with placeholder "ruleset id", and clicking the "new ruleset" button. The page will construct the KRL source code for an empty ruleset of that name and register it. At this point, it won't be installed in any picos, but you will do that later, first manually, and then programmatically.
Manually
You can install a ruleset in a pico manually, using the "Rulesets" tab of a pico. Install your new ruleset manually in each of the section picos you created earlier. Of course, this ruleset would have additional functionality and you would want to keep it in your repository.
Programmatically
Now, let's add code to our app_section_collection ruleset to instruct our new section pico to install its ruleset programmatically. Sometime after each section Pico is created, and before we need to send it the first event specific to sections, we would send this event to install the ruleset in it. This is an "action" which will be placed in the action part of our wrangler child_initialized rule (replacing the noop()).
    event:send(
       { "eci": the_section{"eci"}, "eid": "install-ruleset",
         "domain": "wrangler", "type": "install_rulesets_requested",
         "attrs": { "rids": "app_section" } } )
The event is sent to the child pico, and is handled by the ruleset running Wrangler (as implemented by the ruleset "io.picolabs.wrangler", which is automatically installed in every pico which wrangler creates).
Another way to programmatically install rulesets is to simply provide the a rids attribute when initially creating the child pico, leaving the noop() that we just replaced in the above code. Here is the example:
      raise wrangler event "child_creation"
        attributes { "name": nameFromID(section_id),
                     "color": "#ffff00",
                     "section_id": section_id,
					 "rids": "app_section" }
As it becomes clear which events must be handled by section picos, corresponding rules can be added to the "app_section" ruleset.
Now, create a couple of section picos (using the "section/needed" button in the "Testing" tab), and verify that each of them has the app_section ruleset (refresh the "Rulesets" tab of the new section pico).
After wrangler has installed the ruleset in the child pico, it will raise the pico event "ruleset_added" with the appropriate rid attribute. You could create a rule in your app_section ruleset to respond to this event, by storing the section identifier in an entity variable. We will leave this change as an exercise (a simple possible answer is given below in the P.P.S.).
Automating child creation and rule installation
When you install a ruleset into a pico, you may wish to respond to the pico event "ruleset_added" by automatically creating a child pico. Your ruleset may wish to respond to the wrangler event "new_child_created" by installing an appropriate ruleset into the new child pico. Finally, that ruleset might respond to the pico event "ruleset_added" by sending a your_domain event "ready" to its parent.
Deleting children programmatically using Wrangler
When our app_section_collection pico is notified that a section pico has gone off-line, we can delete it. We'll see in subsequent lessons just how (and why and by whom) this event might be sent. For now, describe the event in the __testing structure and send the event manually from the section collection pico's "Testing" tab.
This could be done by a rule like this one:
  rule section_offline {
    select when section offline
    pre {
      section_id = event:attr("section_id")
      exists = ent:sections >< section_id
      child_to_delete = nameFromID(section_id)
    }
    if exists then
      send_directive("deleting_section", {"section_id":section_id})
    fired {
      raise wrangler event "child_deletion"
        attributes {"name": child_to_delete};
      clear ent:sections{[section_id]}
    }
  }
//remember that when we created the child, we prepended and appended strings to the section name to look like "Section <your section name> Pico", so Wrangler will be expecting the end name in the deletion event.
Congratulations! You now know how to delete a child pico programmatically, by sending an event to the parent pico, to which Wrangler responds by removing the child pico.
Next, see Pico to Pico Subscriptions Lesson, where you will learn how to facilitate communication between picos related in ways other than the parent/child relationship.
P.S. In this lesson, we built the app_section_collection ruleset piece by piece. Follow the link to see it in its complete form. You may find it interesting to compare this with the ruleset you created as you worked through this lesson.
P.P.S. Here is a rule that could be installed in the app_section ruleset, to respond to the event raised by wrangler after this ruleset has been installed in a section pico. Follow the identifier section_id from the app_section_collection ruleset where is originates, into wrangler (that is, the io.picolabs.pico ruleset), to this rule. Notice that the wrangler rule named pico_new_ruleset only requires an attribute named rid, and passes through all of the attributes that it receives, without examining them otherwise.
  rule pico_ruleset_added {
    select when wrangler ruleset_added where rid == meta:rid
    pre {
      section_id = event:attr("section_id")
    }
    always {
      ent:section_id := section_id
    }
  }
**** You are used to specifying relative URLs in HTML. Relative URLs are resolved (as specified in RFC-3986) in the same way by the Wrangler "pico/new_ruleset" event.
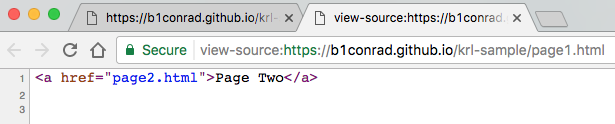
We don't need to specify a complete URL for page2.html, because it is understood that the browser will resolve it to its complete value, "https://b1conrad.github.io/krl-sample/page2.html", based on the URL from which page1 was originally loaded. In a browser, the base is implicitly understood (and is available to JavaScript as "location.href"). With Wrangler, we pass the base, which is available to KRL as "meta:rulesetURI", as an attribute for the pico event "new_ruleset".
Copyright Picolabs | Licensed under Creative Commons.