Manifold is an interactive interface from which end users can install and manage their picos' rule-sets.
Note: Manifold is currently under heavy development and is subject to change. This is meant to be a guide for developers.
Installing Manifold, preparing the root pico for authentication
If you are completely new to the Pico Engine, start here: Pico Engine Quickstart.
- Start an instance of the pico engine from a command line with the initial host set to "http://localhost:8080", or whatever host you are developing on. This is an example command command: "PICO_ENGINE_HOST=http://localhost:8080 pico-engine". If you are using a different port, remember to change the host accordingly and set the port with "PORT=<your port number>" (Ensure that your engine is of version 0.45.2 or higher).
- Clone or download the following Github Repository: Manifold Repository.
- Enter the directory downloaded in step 2 on your local machine from command line and type "npm install" this will initiate an installation of the required dependencies. Once this process finishes enter "npm start" this should start an instance of the Manifold. (You will have 2 separate instances running now, one for manifold, the other for the pico engine). By default this starts on localhost port 3000.
- In your browser, open the page for your pico engine (by default: localhost:8080) and install the following rule-sets on the root pico: (they should all be visible under the Rulesets tab in the Available Rulesets dropdown-menu)
- io.picolabs.oauth_server
- io.picolabs.account_management
- io.picolabs.owner_authentication
- io.picolabs.oauth_server
The io.picolabs.account_management ruleset will automatically install the io.picolabs.owner_authentication ruleset. When installed, the pico engine page will refresh requiring you to login before doing anything else. The default root pico id and password are: "root" and "toor" respectively. If you want to add your own account, enter the Testing tab of your root pico, click the checkbox button for "io.picolabs.account_management" enter a new name and password and click the "owner/creation" button. To access your new account, logout from the top right of your browser window and enter the recently created credentials.)
5. Register the following rulesets with your engine (but do not install them on your pico yet):
- io.picolabs.manifold_owner
- io.picolabs.manifold_pico
The rulesets can be found in the folder "Manifold_krl" at the root of the Manifold project you cloned in step 2.
Registering with the OAUTH server
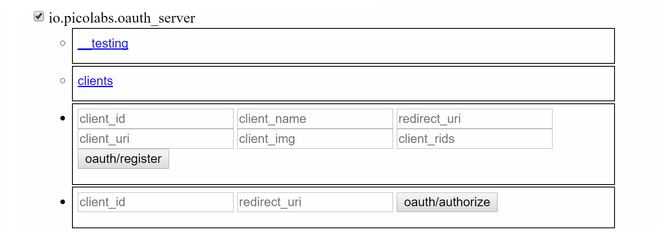
- Enter your root pico's testing tab (not the owner that you created, if you chose to do that), find the io.picolabs.oauth_server, click its checkbox to open up a form submission which will request the following:
- client_id: any arbitrary string. This is usually a UUID, but for local purposes you can use whatever you like, as long as you don't clash id's with another project you register on your engine.
- client_name: any arbitrary string. (A human readable name that identifies your project)
- redirect_uri: "http://localhost:3000/#/code" (This is the default location. Your Manifold may be running from a different one.)
- client_uri: (OPTIONAL) any arbitrary string. This would be a link to some company's website.
- client_img: (OPTIONAL) any image url, this will be used to identify the manifold application. This would be a company logo or other identifying picture.
- client_rids: "io.picolabs.manifold_owner"
- Press the oauth/register button
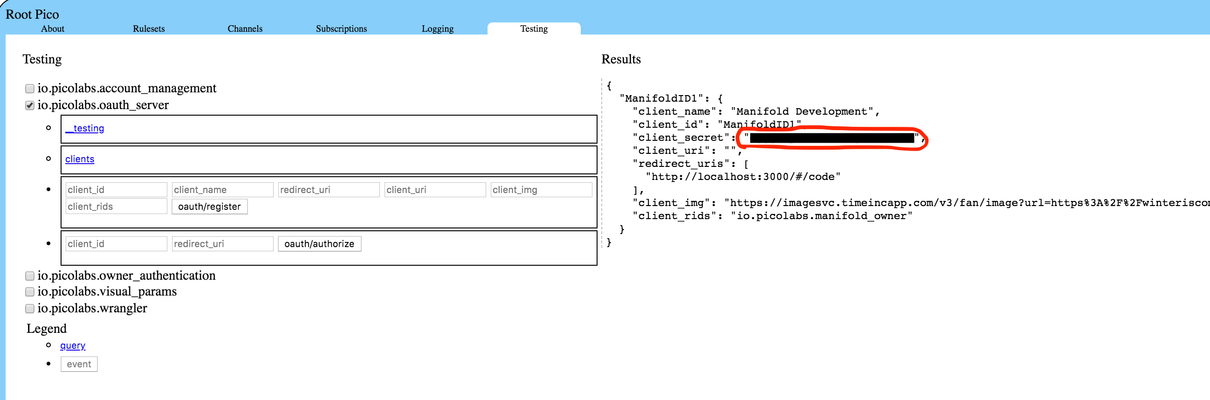
- In the same area of the testing tab, click the blue "clients" link. This will reveal the information recently submitted in addition to a randomly generated client_secret as seen below. Copy this specific string to clipboard (the string circled in red).
Logging into Manifold
In a separate tab, open the manifold page (by default address: localhost:3000/#/login)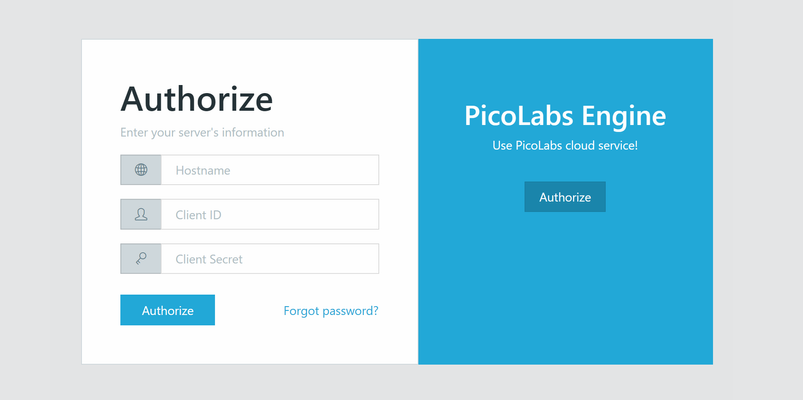
- Enter these fields:
- Hostname: localhost:8080 (or wherever the pico engine is running from). Do not include "http://"
- Client ID: what you had previously entered in the root pico.
- Client Secret: Whatever your secret was (should be in your clipboard)
- Authorize, this should redirect you to a login page on your pico engine requesting an "Owner ID". This can be the default ("root"/"toor") or the owner that you created earlier. This is the same as logging into a website.
- Upon submitting you should see the page refresh with an approve/deny page and your client_img, like the following: Click approve.

- You should be redirected to a dashboard with several graphs. These are all boilerplate.

Updating Manifold
You can now enter your text editor and change the local Manifold files, the program will automatically detect these changes and display them.
- Note that this is built primarily ontop of the React.js framework. If you are an employee of PicoLabs there is an extensive tutorial available to you here: Modern React with Redux.
- If you would like to dynamically observe React elements on the Manifold page, download the following Chrome Extension: React Developer Tools.
To confirm that it has been connected to your pico properly, go to your pico engine. Whatever user you authorized with (whether it was root or an owner that you created) should now have a child named Manifold. In the root pico's rulesets, "io.picolabs.manifold_owner" should be installed. (Appear in the list of Pico Rulesets).